Mosrite Bass (7/10)
Mar 12, 2019
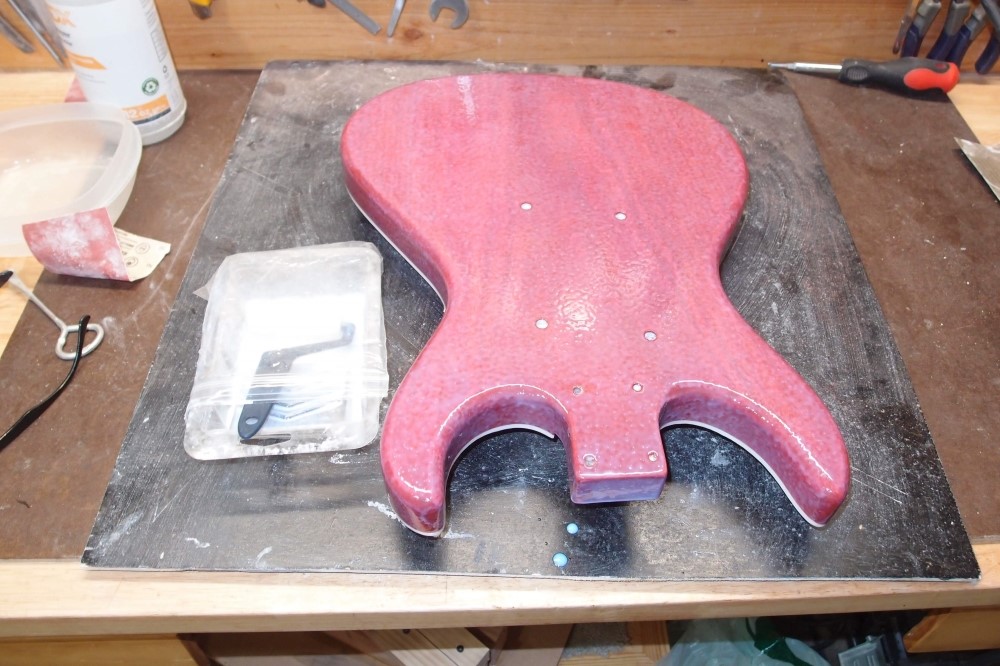
This stuff turned out to be a nightmare. That coat and several others got wiped off before I finally started getting anything like acceptable results. I think the main ingredient is fish eyes. This is actually worse than the aerosol, which left a finish like sand.
After building a usable thickness, it was the ugliest spray job I've ever done. To try and salvage something, I brushed on a topcoat. So much for spraying this stuff, if you have to cover the spray damage with a brush !!! It continually gummed-up the sprayer as well.
At least it sands well. I managed to get back to a smooth surface with 400 dry. Good thing I got it on thick enough, even the ugliest spots sanded smooth. Only went through one small spot on the back. Right now I am rubbing on a few coats to fill the bottom of the scratches. Then I'll see if this mess can be polished.
Can't put oil-based over water-based, so I have no choice but to continue with this and hope it can be fixed. That's a good argument for never using a water-based finish.
This is the second big alternate-finish fail. The first was UV-poly, which seems to be repelled by everything, including itself. It simply won't lie down, after a few minutes it beads up no matter how you apply it.
For a tough long-term finish for the hobby builder, nothing beats good old oil-based real polyurethane. It's smelly, and takes forever to cure, but it is the only finish that really works. Most guitar factories use UV-cure polyurethane or polyester, but clearly not what is available at retail. No major manufacturer uses water-based "polyurethane".
Mar 14, 2019
Further Misadventures with Water-based Finishes
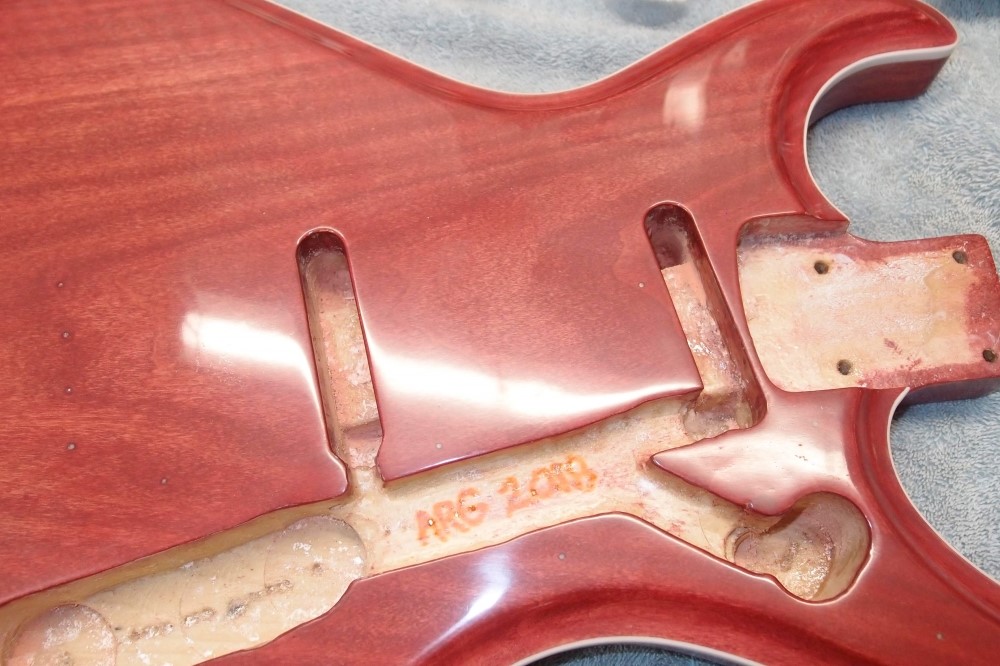
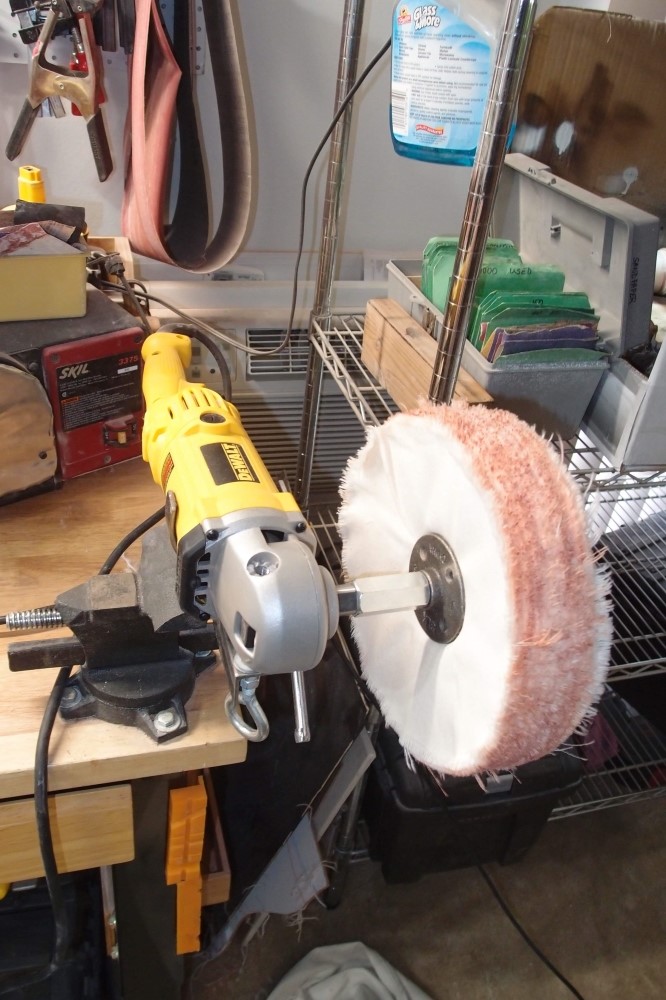
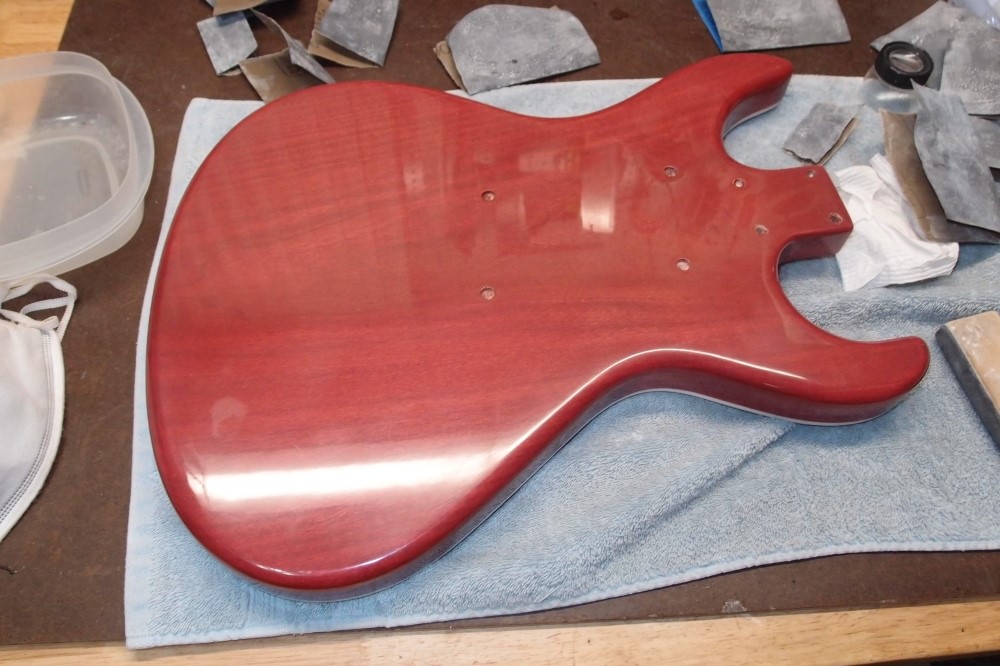
Well, look at that !!! It shines !!! I may actually salvage this thing. The credit for that goes to my new buffing rig, below:
To recap, I found spraying water-based to be a disappointing disastrous experience, both with aerosol cans and compressor.
My first test was with aerosol cans, mainly just to lay down a sealer coat. I wasn't expecting much more than that, which is good, because the results would have been totally unacceptable for a final finish. The aerosol cans were rather expensive as well, I just wanted to test them. They're not worth it, if you want a rattle-can finish, use oil-based Minwax poly.
After several weeks of hanging on the wall, I dry-sanded this with 400 all over to prepare it for a final finish. Then I tried spraying with the compressor. The compressor experience was especially bad - no amount of air filtering or additives would stop the stuff from fish-eye-ing all over. I wiped off a layer of fish-eyes and resprayed, I got a new set in different places, several times, so it is not the surface, it is the 'poly', with two different 'flow-out' additives. Eventually, I settled for just covering the piece with such a thick layer that I could hopefully sand out all the bad.
After reading all the water-based propaganda, I had really high hopes for this. After several hours of seeing things get progressively worse, I decided to never believe anything I read online ever again.
The final coat ( the desperation coat ) I applied with a brush, then misted some water over it so it flowed out nicely. This worked much better than spraying, and is also a lot less noise and bother. If you want to go against my advice and use a water-based finish, skip the sprayer and just brush it on. I did that once years ago. It was so much work, I decided never again, but it did work.
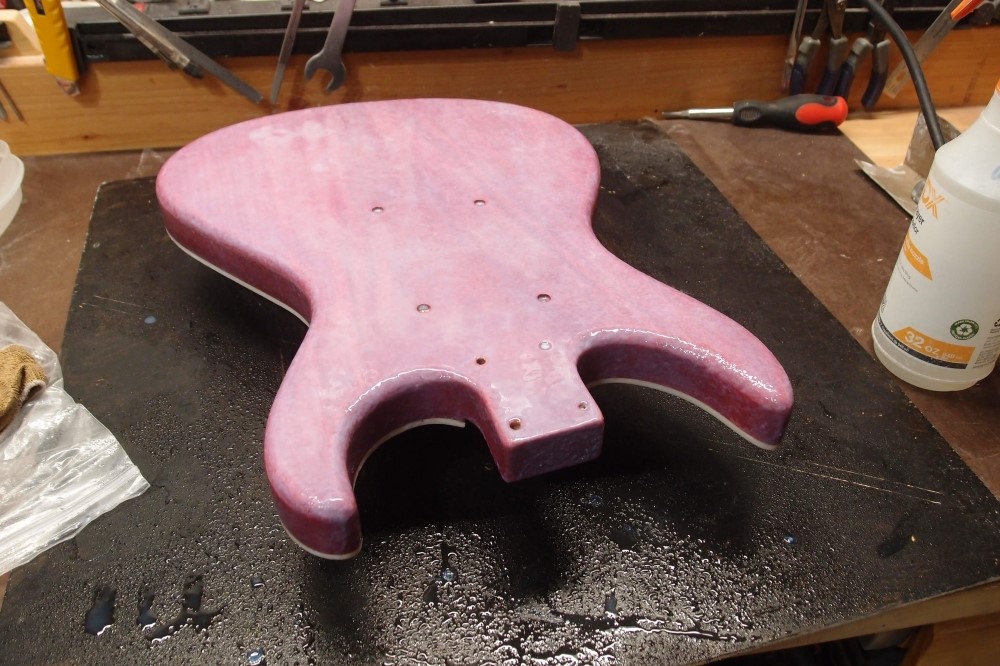
After a few days, I dry-sanded it with 400 all over to remove any brush marks, fish-eyes, cracks, swirls, and a whole lot of other water-based joy. I was surprised to see how it leveled-down, without too many flaws and just one small sand-through on the back, to the undercoat, not the wood. Any success so far is due to my extra-thick finish allowing me a great deal of latitude.
Sanding was actually a pleasure, the paper did not load up much, and I needed very little of it. I rubbed on several slightly diluted layers to fill the scratches a bit, and let it dry for two days. That seems to have fixed the sand-through. This water-based poly has a false 'burn-in' property that makes such repairs work much better than with real poly.
Then I dry-sanded it with 1000. That wasn't so much fun. 1000 dry loads up pretty fast, and I needed a lot of it. I settled for doing just the front, with the German-carved edges, which was a real pain.
Then tried first-stage wheel-polishing, with the coarsest compound. I was quite surprised how well that turned out, and how well my jerry-rigged polisher works. I settled on a speed of about 800 rpm with a 10" wheel. 600 rpm didn't do much, and 1000 rpm generated more heat than I was comfortable with. Initial polishing revealed that more sanding was needed, so I went back to that, except this time wet-sanding with naphtha.
That quickly exposed another lie about water-based finishing - no fumes. Naphtha is as bad as acetone, and worse than mineral spirits or alcohol. Not only that, but naphtha -- supposedly safe on this finish -- attacked it almost as readily as alcohol. I wasn't sure until I did the back and got the same results - physical swirl marks from sanding, with 1000 !!! Also, runs on the sides. I am afraid to use water for wet-sanding on this junk, I have my doubts about it ever becoming really water-proof, or anything-proof.
The only way to get rid of the swirl marks was dry sanding. I tried to capture the swirls in the picture above, where they remain between the pickups and will be covered by the pickguard. But the camera didn't get them.
Everything I have read about water-based finishing online has proven to be false. I still have good expectations of salvaging this project, but that is because my buffer seems to work very well. The final falsehood was "no fumes". Naphtha is terrible stuff, give me mineral spirits any day. Water-based 'poly' is inferior to oil-based in every way except drying time. It does dry somewhat faster. See my synopsis of the chemistry above.
If you want the truth about water-based polyurethane, look for it in home improvement forums. As a floor finish, it costs several times as much as real oil-based polyurethane and has about half the life and durability, both chemical and mechanical. I don't deny that some people are managing to get it onto guitars, but it is more work and higher cost for an inferior result.
The polisher was a pleasant surprise. Not too much noise, vibration, or mess. I wore earplugs, but didn't really need to. I also wore a dust mask, which is a good idea, as my shirt is covered with lint from the wheels. And of course, safety glasses. The rotation of the wheel throws most of the dross down and away. There are places on the wacky Mosrite body that the wheel won't reach, especially inside the German carve. I'll just have to do those with a rag and Meguires.
Once I get the back and sides polished to the same level as the front, I'm going to hang this body up for a week or two and see what the water-based garbage does before I go for the final polishing. I have no idea what to expect, except the worst. It looks smooth now, let's see what it looks like in a week.
History Lesson:
During World War II, GIs would capture German equipment with ingenious improvised repairs that they referred to as "Jerry-rigged". I like that better than "jury-rigged".
The back and the sides rough-polished, even mostly inside the horns. You can see a second dull spot at the lower-left that won't polish out. I must have gone through the topcoat to the undercoat, which is also water-based poly, so I don't understand why it won't polish. This stuff just sucks.
I'll try rubbing some more finish on it and see if that helps. With the amount of sanding it took to get the water-based garbage to an acceptable smoothness, it's a wonder there are only two sand-throughs.
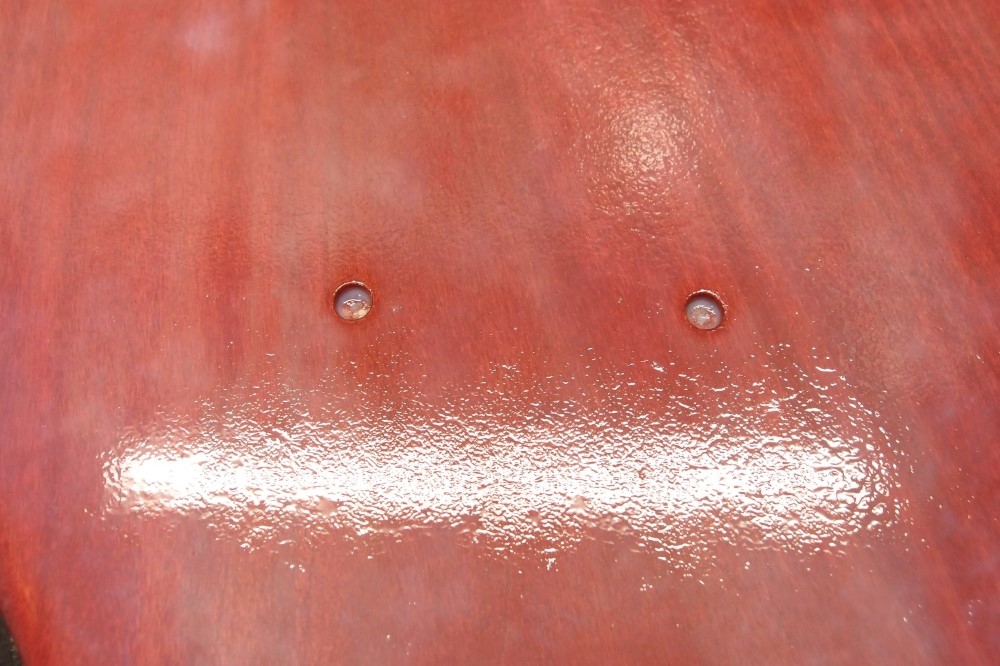
There are also a few perfectly round white specks in the finish that are a complete mystery. I checked them with a magnifier, and they are particles, not bubbles. I think they were in the poly in the can. That might be acceptable on a floor, but it is just one more reason why I will never use this junk again.
Considering how much this body has been messed-around, and the abysmal nature of the water-based finish, it looks better than it should. I should feel better about this than I do. Hopefully, I can fix the dull spots, at any rate, they're on the back. I think this will ultimately look alright from a distance, but it will not bear close inspection. No wonder no factory uses this stuff.
My goal is to make this finish better than a Gibson Les Paul Studio. That's setting the bar low, but I'm coming from behind pretty bad with the water-based sabotage. Never again.
Years ago when these water-based wood finishes first appeared in stores, I thought " Oh man, that stuff just can't work!" I never tried it until now. I was right.
The water-based disaster continues ...
Two bad spots on one surface is not acceptable to me, even on the back. However, attempts to repair them only made things worse. So I sanded the entire back to 400 to refinish it. Two steps back ...
The brush-on poly works badly as a wipe-on, and worse as a spray, so I will get a can of wipe-on and see what that does. I have low expectations. I'm trying to keep the surface on the front and sides, which are not up to my usual standards, but will do.
What I said earlier about no witness marks - I was wrong.
Since I discovered that naphtha is not safe to use on WB-poly, I resorted to nature's original lubricant - spit. That seemed to work ok, although I have my doubts that WB-poly is even really water-proof !!!
Stay the hell away from this water-based garbage !!!
This just keeps getting worse ...
Wipe-on poly is oil-based. In general, do not put an oil-based finish over a water-based finish, in time it will blister from moisture underneath. I'm not going to try it. Now I'm in a bind. I'll just have to press on with the water-based garbage. But this time I'm not going to spray it because to spray it you have to dilute it, and it really resents both. So I got out a brush, but then I remembered my little glue roller. Why not, this is after all just overpriced clear HOUSE PAINT.
Turns out, the roller actually works better than anything with this glorified house paint. Lots of nice orange peel, well that's better than brush marks. This junk is mostly water, so it dries very thin and the orange peel should go down a lot, and the bubbles will burst before they dry, I hope. I'll keep putting it on wet-over-wet to build a single layer.
Luckily, I have a hard edge by the binding, so I can wipe away drips with a wet rag and hopefully keep the front clean. If I get it on thick enough, I have a chance of sanding it out. Or maybe just leave the orange peel on the back and sides. Gibson does.
Painting a guitar with a roller. This is ridiculous. Do not believe anything you read about water-based guitar finishes. Everything looks good in little pictures online. I'd like to see one up close in person. I wouldn't even use this stuff on a floor.
I got suckered into using house paint on a guitar. Luckily, I am an excellent house painter. For a while, I did carpentry for a high-end house painter, and I learned a lot. Basically, I found out that everything I ever knew about painting before was wrong. We did some amazing stuff together.
Another thing that just occurred to me about a water-based finish - I'll bet if anything greasy or oily ever touches it, it will leave a permanent stain, just like the walls in your house. Better keep your hands clean, and don't sweat on it !!! In hindsight, I can't believe I ever fell for this.
This may actually work. As soon as it is mostly clear I roll on another coat. ( It goes on white, like sugar glaze, and probably offers about as much protection. ) If I see a run, I just roll it out. Maybe I have discovered a whole new way to finish guitars badly!
I have to laugh. Painting a guitar with a roller !!! But it works better than the sprayer - no fish-eyes at all. The roller has shed a few hairs; I plucked them out with tweezers.
Needless to say, I am not recommending this. Just stay away from water-based finishes.
I misted some final water over it, picked out some roller hairs, and this is it. I bet this dries as good as the sprayed finish, and a good deal thicker. That's not really a comment on how good this junk rolls, but how bad it sprays. There are a few discolored spots, but hopefully, that will clear up when it dries. What an adventure.
I am seeing indications that the supposedly cured undercoat turns white under the new wet coat. That gives me great concerns about how durable or permanent this water-based poly is or isn't. Can you even get it wet? This is no way to finish a guitar, or a table, or a floor. Water-based wood finishes are just EPA-mandated garbage.
Look at that orange-peel !!! That's not just orange-peel, it's crinkle !!! At no extra cost !!! I just can't say enough about these terrific water-based finishes.
Knowing how low the solids content is in this government garbage, I expect this will lose 40-60% of its thickness, and level considerably by morning. It's mostly just expensive water. If not for the regulators, this junk would not even exist.
The discolored spots under the finish have dried-out and blended in, as I expected. I touched it between the neck screws, and it is still very sticky. This represents half of what I had left or about a quarter of a can.
Actually, if I get this crinkle finish evenly all over the entire back and sides, I am inclined to leave it. This sort of texture hides damage well, and this water-based 'poly' is nowhere near as tough as the real thing, from what I have read in floor finishing. It may be tough enough for a guitar, but it is certainly not the best thing you can get.
The front will still be shiny, barring some new water-based disaster.
I want this water-based nightmare to end.
The crinkle is getting more and more even. The spot I touched before is no longer sticky. If it looks like this in the morning, I'm keeping it.

This is now skinned-over and the red color is completely even again. I just picked several white nits out of it and drop-filled the spots with a toothpick. They will disappear into the crinkle. This is a near-flawless leather-like texture that should hide dings and scratches very well.
I'm actually kind-of enjoying this. I think I've invented something. Eureka !!! There may be there a use for water-based "polyurethane" junk after all. I always put polyurethane in quotes when talking about water-based, because you really don't know what it is. Most of these terms have long since stopped meaning anything, it's all just marketing.
It's dry enough to pick up and thank heaven, the front is still clean.