Kubicki Factor Bass (2/13)
Dec 10, 2017
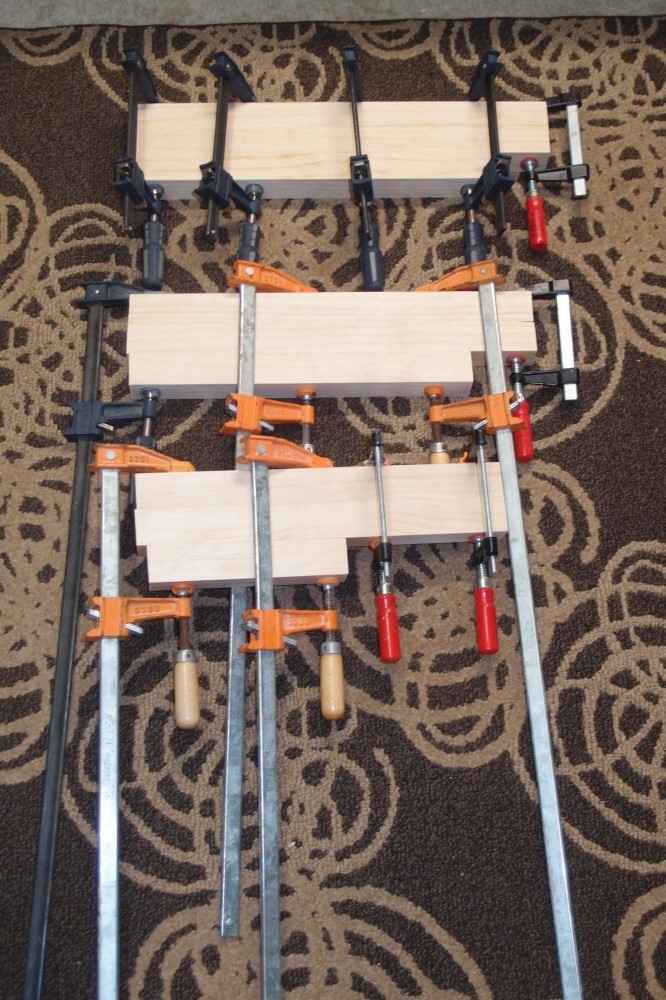
I have started gluing up the Kubickish body from Radiata 2x2s. The photo shows three sub-assemblies. I don't have enough medium-sized clamps, I have to use the cumbersome long ones. You could do this entire job in four stages with just four 18" clamps - three sub-assemblies, one at a time, and the final assembly. Five dollars each at Harbor Freight.
Since the long clamps make fine alignment difficult, I put the sub-assemblies together with short clamps, then swapped them out one at a time for the next assembly. Again, I aligned the front face as perfectly as possible, and let all the errors collect on the back. That way the slab will come out flat, with all the pieces aligned to the front. I had cut these pieces a while ago, in the future I will make square or symmetrical blanks so that I can pick either side for the front.
The nice thing about the 2x2s is that you can rotate them to pick the grain you like on either of the two pairs of surfaces. Generally, one pair will have a tight well-defined grain, and the other will have a looser more feathery grain. The reason this particular lumber is useful like this is that it has very flat faces and very sharp corners, and very precise shape and dimensions, so after a bit of sanding, you get a perfect surface. You couldn't do this with 2x4s, the rounded corners would require a great deal of sanding to remove the resulting crevices, and result in a considerably thinner slab.
Try to place all the sections cut from a particular piece of lumber next to each other. This will minimize discrepancies in thickness and result in less sanding later. Tight clamping means a lot of glue squeeze-out, which needs to be wiped away from both the piece and the workbench with a wet rag. You only need the thinnest possible film of glue on both surfaces, any more just goes to waste and makes a mess. You can put the glue on thinner if you pre-dampen the surfaces.
After a few hours, I can break the clamps and glue the assemblies together.
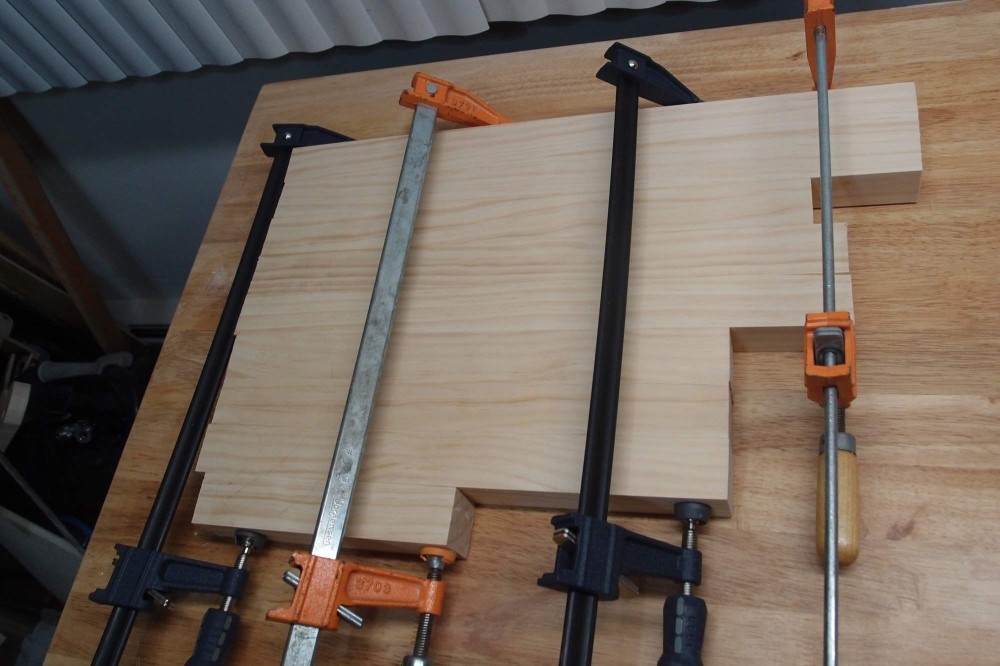
Final glue-up. I actually went to Harbor Freight and picked up the two blue clamps. The orange ones are good Jorgensens. You can see how the cheap ones flex, the bars are not nearly as stiff, but they are good enough.
When this has dried I will sand both sides flat and smooth for a perfect body blank, made from Home Depot wood, without either jointer or surface planer, or any power tools at all.
Dec 11, 2017
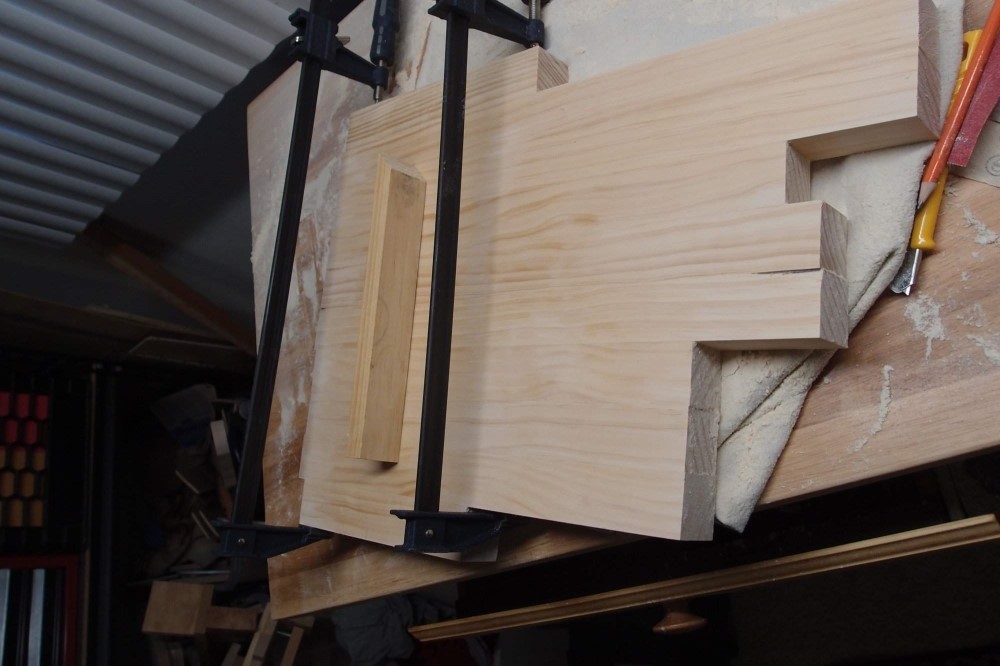
After sanding, I laid the plans over the blank and found I had left a piece off. I also found that the blank has a slight cup to the front and a corresponding bulge to the back. I have already sanded out much of it, but you can still see a gap under the scrap block. After I have band-sawed the rough outline, I will sand it flat - no sense sanding wood I am only going to cut away.
This problem could have probably have been avoided or at least minimized by flipping the center sub-assembly. But in making the blank tight to the final shape, I didn't leave myself that option. Learning all the time - it may waste some wood and glue, but make your blank more or less rectangular. This way you can rearrange the sub-assemblies, dry-clamping to find the flattest configuration, then glue. It also allows you to choose the better of the two sides for the final front.
I really should work slower, and make sure neighboring pieces have opposite grain. You have to assume that no piece of lumber is perfect, even if it looks perfect, as these do. If you cut a group of neighboring pieces from a single piece of lumber and assemble them, you would hope that randomness will cause the imperfections to cancel each other out, but that obviously didn't happen here. I think I got really unlucky, the odds of all the imperfections adding up instead of canceling are pretty low, but I did it. Perhaps it is better to make sure that no two neighboring pieces are from the same piece of lumber.
This cupping is no worse than I have seen on large pieces of poplar, and it is avoidable. Being glued up from strips like this, I would expect the finished product to be much more stable in the long run than a one or two-piece blank. Each of the small pieces may have its own tendency to warp, but glued to its neighbors, everything should cancel out. My other experience with large poplar blanks is cracking. That is really heartbreaking when it happens to a finished build. Yet another issue with poplar is uneven sanding. Due to differences in hardness across the grain, the more you try to sand a piece of poplar flat, the wavier it becomes, much like oak. To get a truly flat surface with either of those, you have to cut it and then not mess with it. I am not seeing that problem with this wood.
Having discovered this method, I am done with poplar. Clearly, this method is not as simple as I first thought, I got lucky with the first one - it came out perfectly flat. I will refine the technique and apply what I've learned to the third one.
Radiata is better than poplar in every way. It is harder, better looking, easier to work, cheaper, and much more available. And all of that goes for alder, basswood, paulownia, and a host of other 'luthiery' woods as well. Look at the hunk of wood I just assembled, and then go on eBay and look at body blanks that cost 5-10 times as much. I won't be buying any more of those either.
If this blank ends up seeming too thin for its size from all the sanding, I will cap it with a piece of 1/4" maple plywood and binding.
Dec 11, 2017
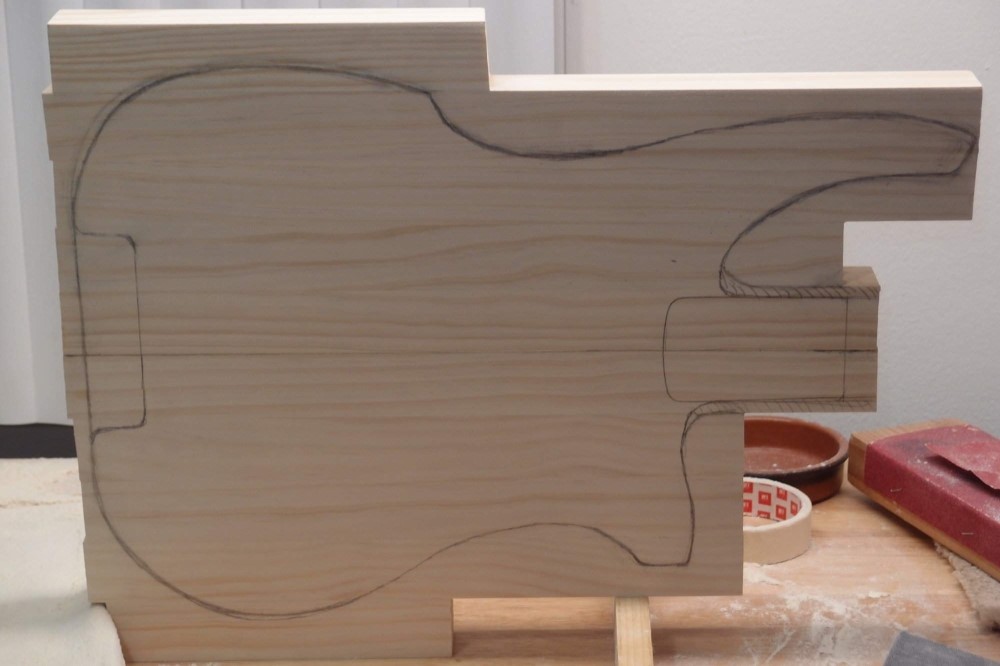
This is about ready for the bandsaw. To transfer the outline from the parchment drawing, I penciled in the centerline on the blank and thumbtacked the drawing over it. The tacks went into waste wood. Then I took the corner of a small screwdriver and traced over the outline, making an impression in the wood. That left my blueprint largely unharmed. Finally, I traced the impression with a pencil.
I've been making some adjustments, I slimmed it down a bit and lengthened the upper horn, too much I think now that I look at it again. The lap curve could be smoother, with a bit more offset. At this point, it is best not to rush to cutting but set the blank up where you can see it and spend a few days fine-tuning the contours. My intention to suggest a Kubicki, but not strictly copy one.
The butt is straight so that it will stand upright on the two strap buttons bracketing the tuners. That's a Ned Steinberger bit of cleverness. His early minimalist designs may not have been great as guitars, but they had a lot of clever and original details. The cutaway at the back is for the tuners, and it is deliberately offset.
For the first cut, I am only going to do the outer edges, not inside the horns. You need some extra wood there to support the router template for the neck pocket. It will be a standard Fender bolt-on neck installation.


