Kubicki Factor Bass (11/13)
Mar 4, 2018
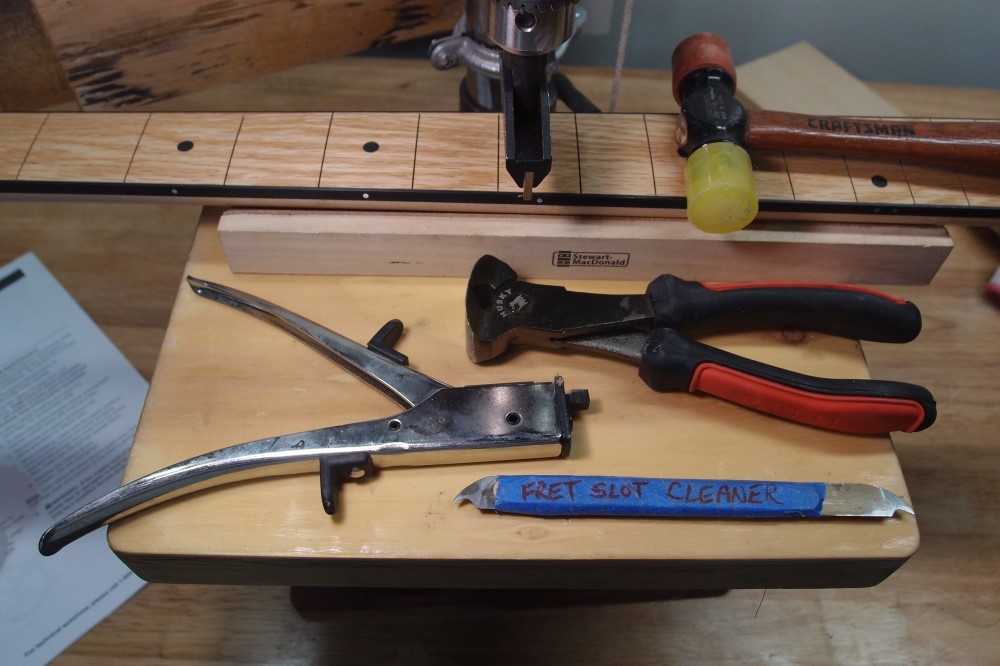
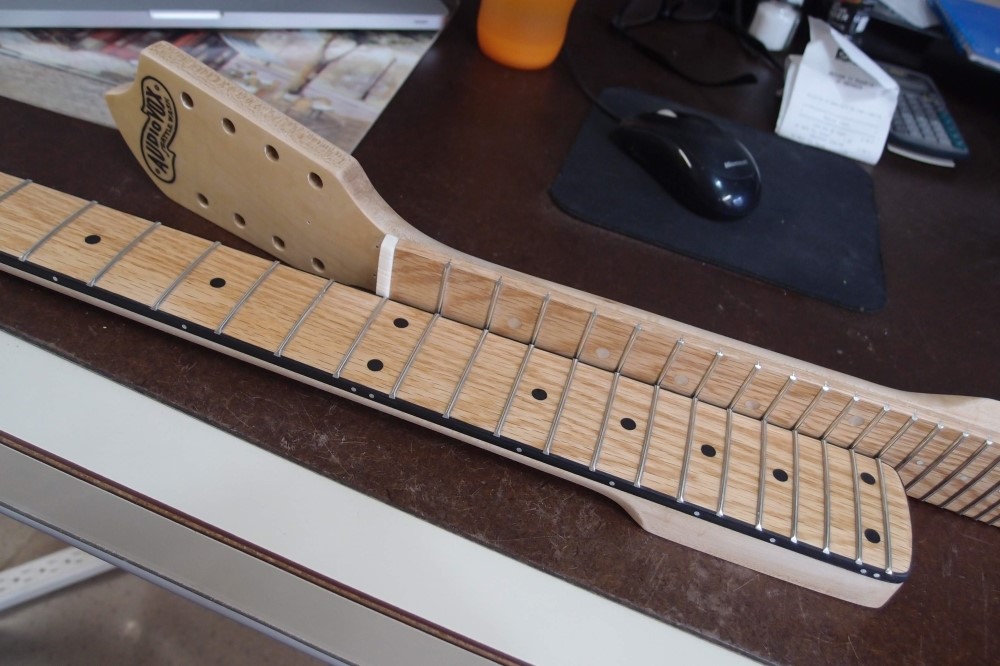
Getting set up to do the frets. The fret tang nipper is made from a sheet metal nibbler, which you can get online for under $20. To convert it for "luthiery", you need to file a small notch across the cutting face, just big enough for the fret to lie sideways with the tank flush against the surface. This tool works like a charm, removing the tang perfectly flush - no further work is needed. I have never tried any other method, although the descriptions of using a Dremel sound like pure torture.
The StewMac fret press arbor is mounted in the drill press, and a chili can is under the table for support. I use the press much like I use the hammer - I press one end in, then the other, then the middle. This requires much less force than going for the whole fret at once and results in a tighter job. You still need the hammer for small adjustments.
This is a very tedious job. Every fret must be cut and nipped to length individually to fit each slot. 24 frets means 48 ends. You need to leave a little space on either end of the tang so that it does not push against the binding, even if the fret does not go down perfectly centered. The ends of the fret should sit tight on top of the binding. Once all the frets are in, dress the ends as before.
And you get this. I have also installed the nut. The nut had to be notched on each end to fit the binding, much like the frets. I made the initial cut with a razor saw and worked it out with a file. Then I filled the slot with white glue and pushed the nut in. It is already solid, but I imagine it will take several days to fully cure. I checked it over with the fret rocker, and after whacking down a couple of proud frets with the hammer, it is perfect.
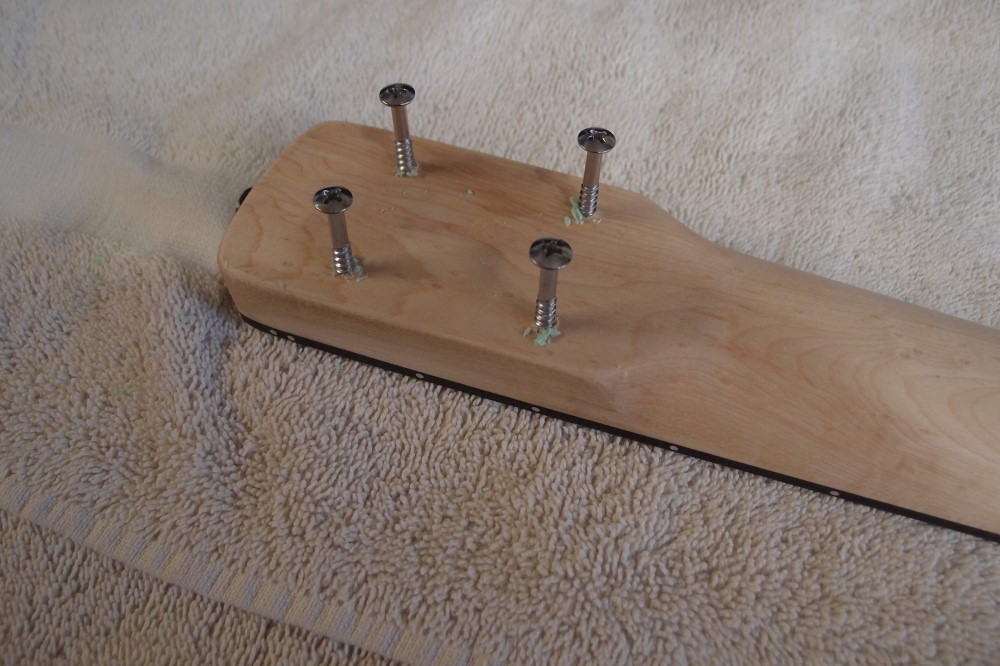
The last operation on the neck is to mark and drill the mounting holes. First I drilled out the holes in the body to 1/4" for #10 screws, so that they are a loose fit. Then I temporarily mounted the neck with a clamp and made sure it was properly aligned, before pushing a screw through each hole to make a dimple in the neck. I punched the dimples and drilled 1/8" holes to just short of the fretboard. Use a piece of tape on the drill bit as a depth marker. Finally, I soaped the screws and drove them in to pre-cut threads in the wood. The close-up lens makes them look crooked, they are straight.
After removing the screws and the truss rod, a final light sanding and wipe-down with alcohol, and it will be ready for final finishing. It will get a single light coat over the front to cover any marks from the fret installation, and then several coats on the back and sides. Any poly on the frets will wear off in a short time.
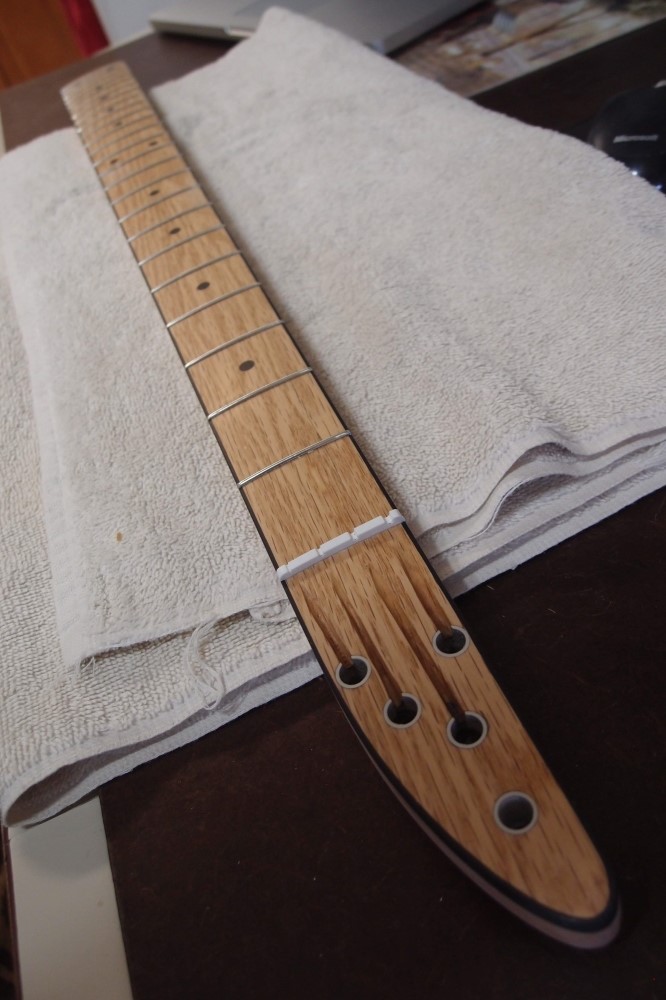
The oak looks pretty good with the frets and black dots and binding. Too bad it is such a pain in the ass to work with. If I had not bound the fretboard, I would have been left with the unfinished and unfilled raw cut edges, although that is really not so bad on the dinky neck. That one is also ready for final finishing - the decal is flush and the headstock has been shortened to fit just around it.
This is an interesting shot showing how the scales of the 32" bass neck and the 17" dinky neck come together. The dinky will be tuned a full 2 octaves above the bass.
Mar 7, 2018
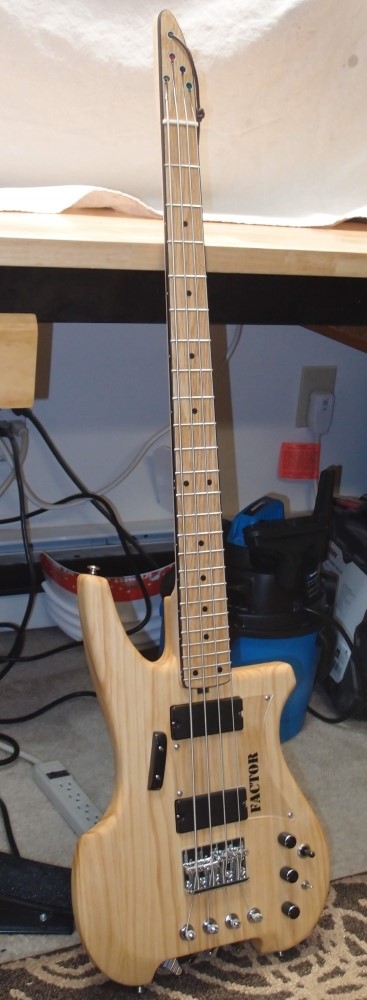
It's snowing pretty hard out there, so a good time to build something. Here is the "Factor", fully assembled. It is my experience that a just-built guitar needs several weeks to settle-in before you can properly set it up and judge it, so this is just a first impression.
At the moment, I have not yet plugged it into anything other than a tuner, and that was just to get the strings to the proper tension. I snugged-up the truss rod and set the tops of all the saddle screws flush, which gives a playable action. I also tapped down some high frets and set the intonation.
The long 32" neck gives about the same reach as a standard 34". All-up weight is 7-1/4 pounds, not bad at all. Balance is good sitting or standing, just a little neck-heavy. Overall, it feels very good in your hands.
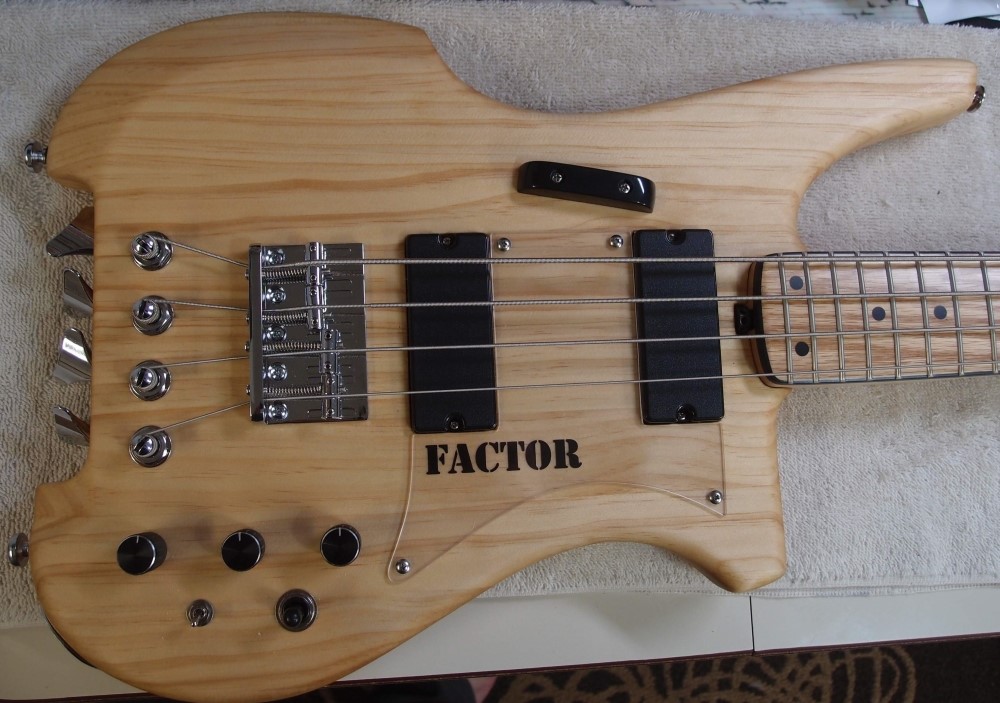
Here is a shot of the body. Build details:
Body: glued-up from 2"x2" Radiata pine, Titebond, Home Depot
Finish: real Tung oil, WoodCraft
Pickups: generic 4-wire soapbar humbuckers, eBay/China
Bridge: generic 'heavyweight' zinc, eBay/China
Tuners: generic compact sealed, eBay/China
Electronics: Belcat active bass/treble, battery box, jack plate, eBay/China
Switching: parallel pickup selector, 4pdt pickup mode switch, passive switch on volume, eBay/China
Knobs: aluminum 'stereo' knobs, eBay?
Pickguard: 1/8" clear polycarbonate, leftover window pane
Logo: inkjet printed overhead transparency material, leftover
Fasteners, etc: stainless steel, marine supplies/Home Depot
The body thickness works out to about 1-1/2", on the thin side. Luckily, Radiata is pretty heavy for pine, and with the long upper horn, the whole thing handles well. The neck/pocket/bridge alignment is pure Fender and everything lines up as soon as you put it together. The body is approximately Strat-sized, smaller than a typical bass.
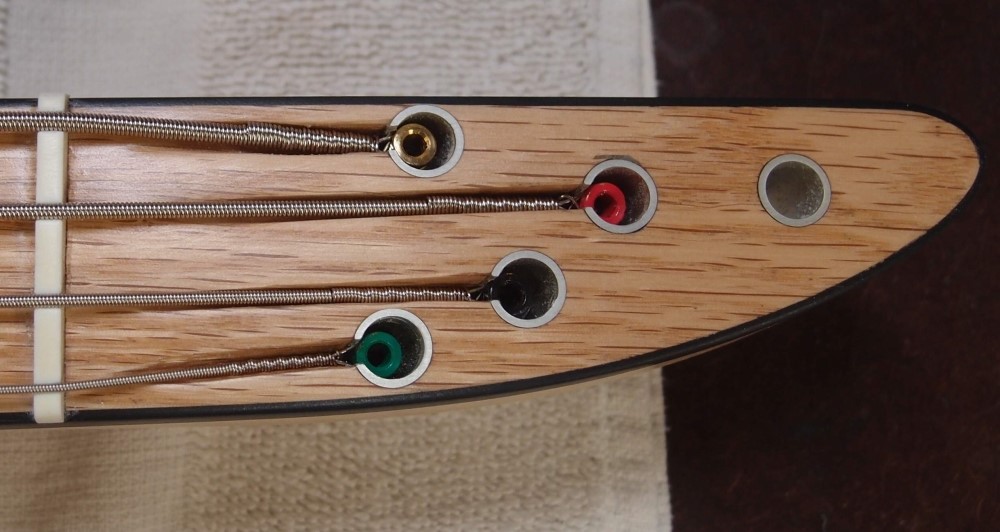
Here is a close-up of the 'headstock'. Neck build details:
Neck: 3" birdseye hard maple, 32" scale, Home Depot
Fretboard: 1/4" red oak, 12" radius, Home Depot
Finish: satin polyurethane, Home Depot
Mounting: chrome plate, eBay/China
Nut: plastic P-width, eBay/China
String Retainers: 10mm aluminum tubing: eBay
Binding: 6mm black plastic, eBay/China
Binding Adhesive: 'Bind-All', StewMac
Frets: 24, jumbo bulk fret wire, eBay/China
Markers: 1/4" black plastic, pickguard scrap
Side Markers: aluminum wire, Home Depot
Truss Rod: 3/16" round steel rod, #8 coupling nut, shrink tubing, Home Depot
Truss Rod Nut: spoke nut, StewMac
Strings: D'Addario 50-105 roundwound, eBay
The string retainers are about 1/2" deep and angled back about 10 degrees to keep the string balls from walking out. The break-over angle on the nut is almost like an angled headstock. Otherwise, it is basically a standard Fender neck, with a very long single-acting truss rod.
Stringing and tuning presented no problems, a capo helped keep the string ends in place while they were loose.
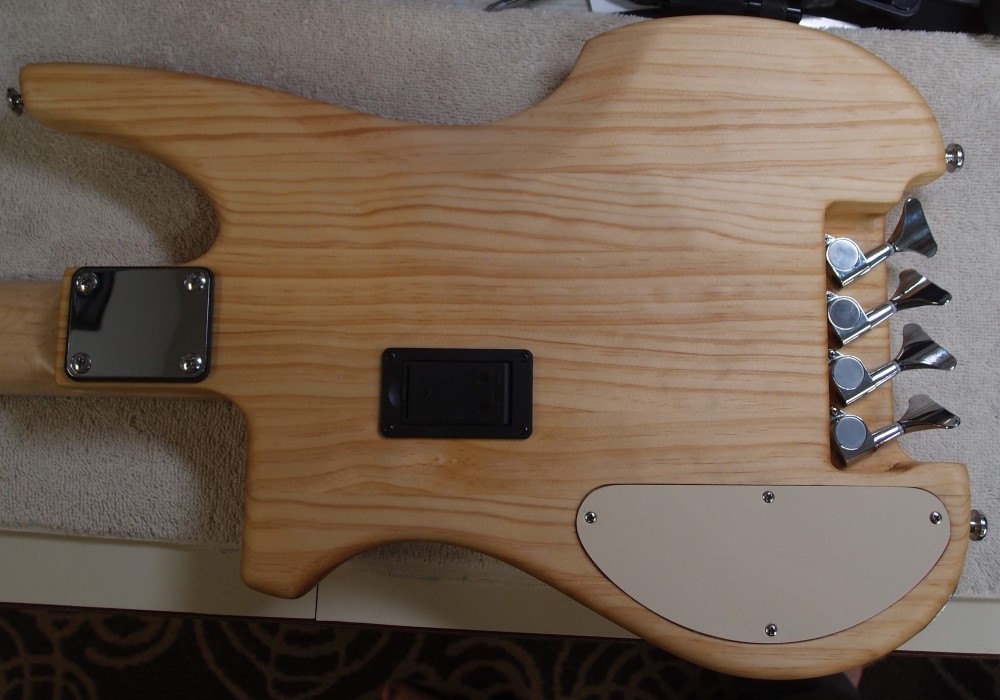
Here is the back, showing the tuner installation. The tuners are angled for the most compact spacing possible. The body is cut as though it was a headstock, 9/16" thickness. The pine has no problems holding the tuners, Radiata is fairly hard stuff. The tuner knobs are fully inside the body edges to protect them from accidental bumps. Adjusting the tuners is not a problem. The double strap buttons act as feet to stand the instrument upright on the floor.
I made a new template set for the electronics cavity. The battery box is located to act as a conduit for the neck pickup wiring. The electronics are fully shielded. The cover is from a scrap of shower wall plastic.
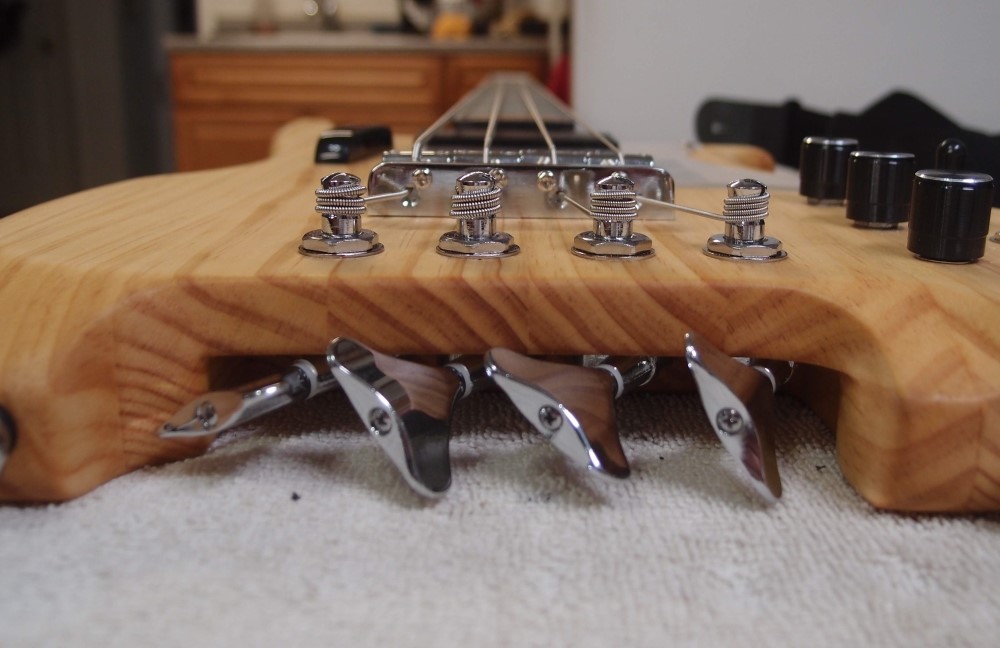
Here is another view of the tuner installation. The string angles into the bridge are not excessive, and there is no binding, everything works smoothly. The tuners are arranged to give a symmetrical string fan-out, so they are a bit off-center. It looks good and seems to work fine. This tuner installation was first used on the 1980s Kramer "Duke" model, it is not my own idea, but it is a considerable improvement over the original.
From this angle, the laminations in the body are apparent, from the front and back it takes a very sharp eye to see them. The A and D strings are a bit too short. Although it is a medium-scale bass, it needs long scale strings. The problem is more theoretical than actual, there is no audible difference. I'll fix it eventually.