Kubicki Factor Guitar (6/8)
Mar 4, 2019

Sanded up to 150. No sense going past that, unless you want the finish to slide off. Radiata responds well to light-colored stains like this. The grain washes away under a dark stain.
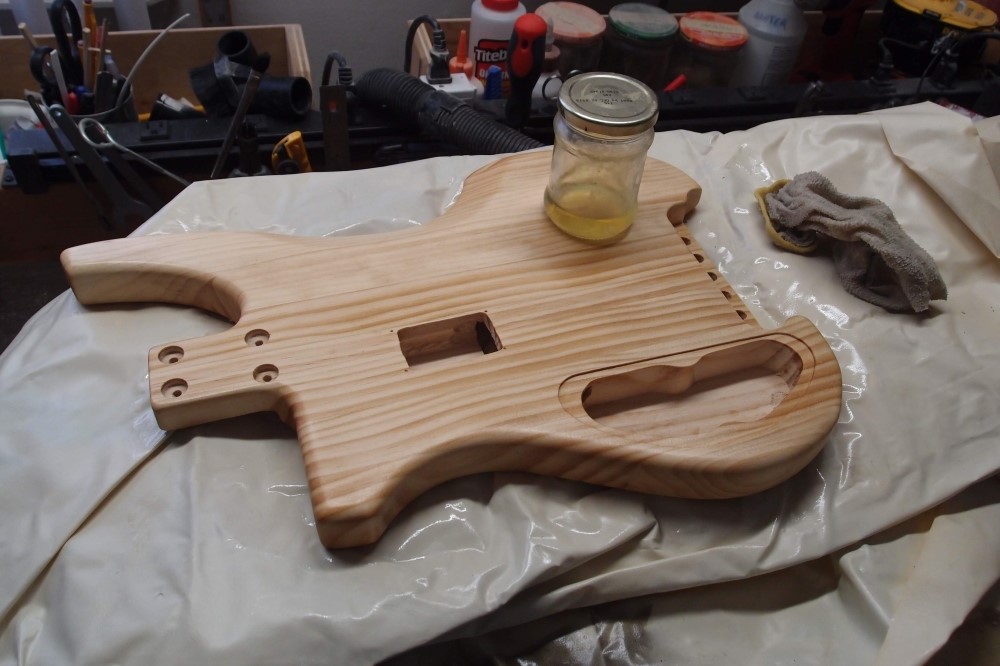
Together with the bass, which is finished in real Tung Oil ( not the fake stuff at Home Depot. ) I'm thinking of shooting both of these in the poly Tobacco Burst I used on the last Audiovox, which was also Radiata. I'll give the new one several coats of Tung oil to match the color, and a month to dry. The old one is dry enough to over-coat right now.
Tung Oil was an interesting experiment, and it is useful to have a jug of it around, but I do not consider any kind of oil to be a proper finish for a guitar. There is no protection at all. It may look good when you first put it on; after a few weeks, it dries out and looks dead. Re-oiling a built guitar is a real pain.
I can't see how to fit any more knobs without making a mess, so the new one will get volume, tone, and a fuzz circuit I've been wanting to build, as well as the pickup selector and mode switch. Both will have the exact same cheap Chinese pickups.
While I still have the option of converting the new one to a Bass VI, I'd rather save those parts for something else, together with a Jazzmaster-type bridge and tailpiece.
Mar 15, 2019
The Tung Oil has completely dried, so I took this down and gave it a quick sanding with 400, then wiped it down with alcohol. The Tung Oil seals the grain and gives an amber luster to the wood, but is in no way a protective finish. I tried to build a layer of it on another project, and that just turned out to be a mess, and I sanded it off. Maybe I am too fussy. The alcohol had no effect on the Tung Oil, unlike what I found with water-based 'polyurethane', which is garbage.
Next up is a thin undercoat in preparation for shooting a dark brown burst like the previous Strato-vox. That will cover all the end-grain and hide most of the obvious glue-up. The resulting clear center looks like solid wood. For the undercoat, I am going to try a rattle-can of Krylon satin poly from Hobby Lobby.
With a 40% coupon, if it is good, then the Krylon is a best value, especially since Lowes seems to have jacked the prices on Minwax since they got an exclusive on it. The Varathane aerosol poly at Home Depot is very disappointing - it is too thick and goes on rough. That would also make a good undercoat. In fact, most of the Varathane products at Home Depot have been disappointments at best. Lowes is a little further, but worth the drive to get the good Minwax products.
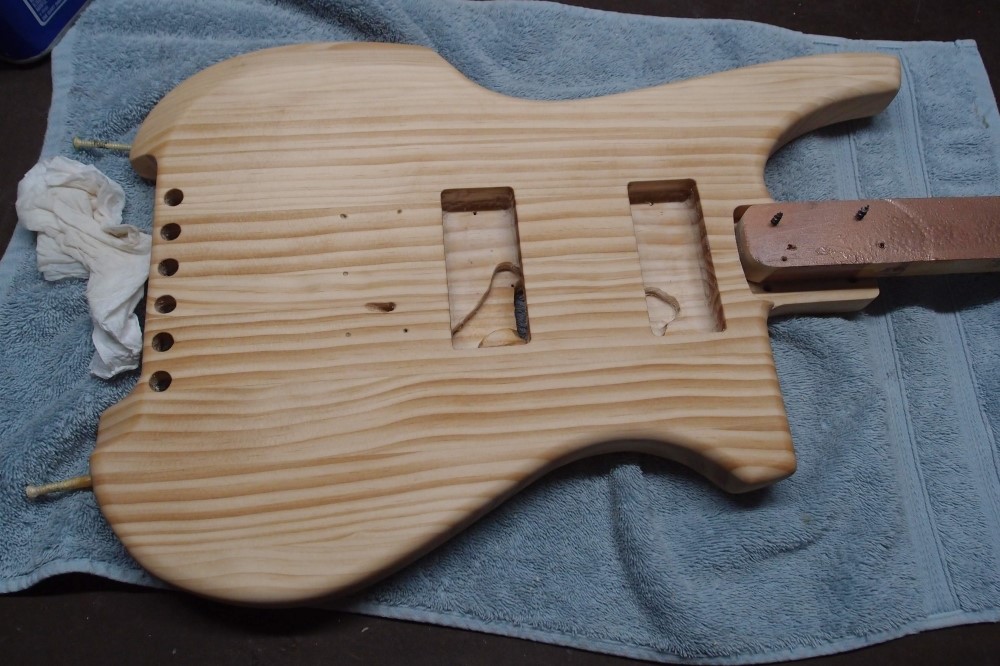
Notice I need two tail screws for the finishing setup. That's not going to flip so well on the stand. Those will be strap buttons on the finished product, and also 'feet'. Also, I rounded the end of the handle stick to fit the neck pocket, for better sustain. Perhaps I should put in a 45-degree screw to stabilize the painting process.
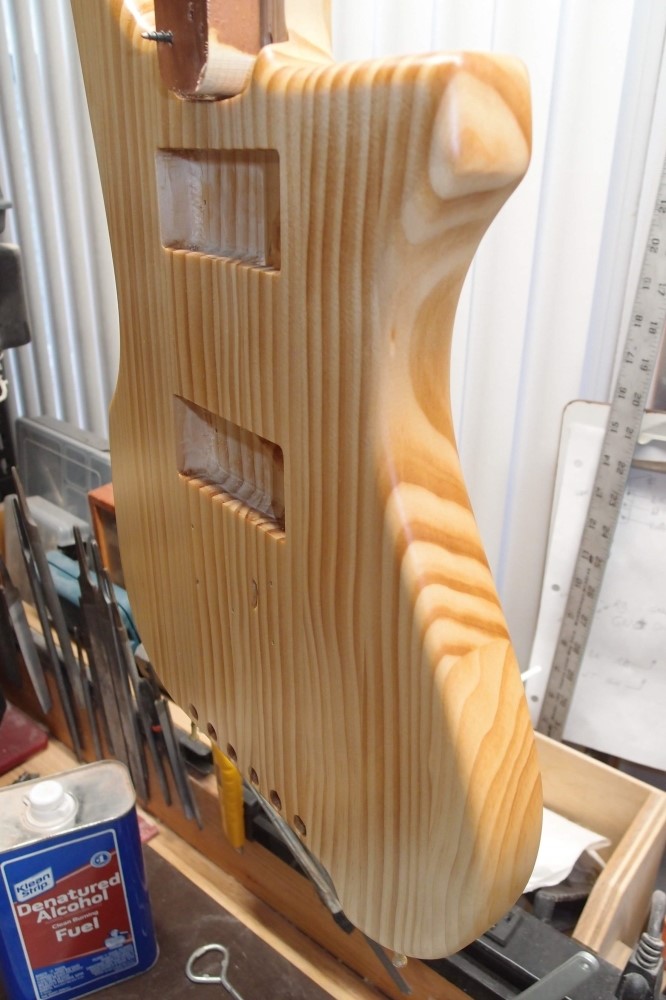
There's a bit of dark pine pitch inside the horn on this body - the first time I've seen that with this wood. I've used some white pine for body cores, and there is no getting away from pitch marks with that. It will get covered up by the burst. In fact, that is probably the reason sunbursts were invented - to hide the ugly edges of things without completely covering up the wood. Fender's three-tone burst was originally just the accidental mixing between the dark edge and the yellow center.
Home Depot usually has a rack full of this wood, so you can cherry-pick your pieces, not like ordering wood sight-unseen online. See earlier in the thread for the trick I played on a supplier who sent me a bunch of unusable pieces.
It's a nice warm day for March, I think I will take this outside and poison Mother Gaia.

Wow, the Krylon goes on really nice. I'm going to get some more. Killed a few birds and a squirrel, but there's plenty more of them around. It's not like I set up a wind farm and started slaughtering eagles.
I mainly use aerosols for necks and small parts, it gets too expensive to do a whole body the way I want to. Also, with aerosols, you have a very limited color selection and much less control. With a compressor, I can tint to any color I want, and use the right gun for the job. For a nice feathered burst, an airbrush is best. The undercoat allows you to easily sand off any stray dots. For an overall coat, a touch-up gun works better.
Between the Tung Oil and the wet poly, the pine has started to shimmer from inside. Radiata is a really nice wood - beautiful, knot-free, straight-grained, easy to work, easy to finish. And all you greenies will be happy to know that it is farmed. I wonder where I can get slabs of it.
The Krylon really did dry in 15 minutes, and flawless. I may have a new favorite polyurethane.
Here's a close-up of the lower edge, to show just what you can do with this construction and finishing. That's just one thin coat of satin poly. For a real finish, you'd want to shoot out the whole can, better, two. For someone who doesn't have a compressor and the whole rigmarole, this would be a good option. I'll have to keep trying this Krylon on different things, but if it keeps up like this, it is hands-down better than Minwax, which was the previous best I could find. And it is a good deal cheaper.
I think the wood grain of the Radiata is really striking and beautiful. The pieces are square, and usually have a tight grain pattern on two opposing sides, and a loose pattern on the other two, so you have a choice from one piece of wood. Here I went with the tight patterns, you can sort of see the loose patterns on the edge. The grain pattern of this wood is as striking as ash, without all the problems of that open-pored wood. It is much nicer than alder, just as easy to work, and also harder. And the color is nice, even under a clear-coat, unlike poplar, which is greenish and must be stained. The glue joints are hard to see, especially with the tight grain pattern.
The one disappointment I've had with Radiata was staining it. Although it takes stain pretty well, the results are very blah - the nice contrasty grain you see in this picture just fades away under a dark stain. This is in contrast with poplar, for which stain can really make the grain pop, and also hide the ugly color of the wood.
One thing about satin finishes is that you don't have to polish them, and you really don't want to. The satin comes from 'flatting agents' in the mix. If you do polish a satin finish, you'll find that it turns into a pretty good gloss, not quite a real gloss, but much more than a semi.
Of course, this makes satin finishes a problem to repair scratches and dings. The repair ends up shiny, and the only thing to do for that is shine up the whole piece. I have one or two factory guitars where the satin dullcote was scuffed in shipping, leaving shiny spots. I actually buffed off all the dullcote and shined up the underlying poly to a much nicer, if slightly orange-peel-y, automotive-like finish.
That's when I realized why satin finishes became all the rage with manufacturers - it's cheaper to spray on a layer of dullcote than to sand and polish the whole thing to a proper gloss. Of course, the marketing boys can always come up with a reason to charge a premium for what is really cost-cutting. This sort of tomfoolery has gone on in the industry for decades. Don't buy into it. Remember "thin nitro finishes"? Ripoff !!!
While it is possible to sand a gloss finish back to a satin, it is not easy to get a good result. I did manage it on a few prior projects. Sanding a shiny spot on a dullcoted body is never going to match, it's just going to keep getting worse. Just shine up the whole thing. Dullcote comes off pretty easy.
As far as I'm concerned, guitars should shine. I only do satin when I'm feeling lazy, or if it is a project that I don't want to spend another nickel on. The two Ric 325s were both trash that I never got around to throwing away. I always do necks in satin, for a slick feel. Gloss feels sticky.
This is my usual way of doing things, and it works great. Can you understand why I got so aggravated with the water-based 'poly' fiasco?
Keeps getting better and better. Maybe I will forego the burst and just clear-coat this body with the whole can. Doesn't get any easier than this.
When I built the second one of these, I was much more careful about 'orphan control'. For example, the entire lower edge is just two pieces and one seam, while the upper edge is three pieces. The long horn is a single piece. On the first one, the horn is two pieces, and the lower edge is four.
The difference is that I slipped a piece of 1x2 in a strategic spot on the new one that shifted all the glue joints. That makes for a lot fewer visible joints and much cleaner-looking sides - they really look cool, no reason to cover them up. The oil-based poly is starting to warm the color up nicely. The end-grain is still drinking it in pretty good.
Since this satin won't need polishing, I'll be out of here in a hurry. Once this one is done, I'll do the same on the older one. I feel so much better, the last few days of water-based nightmare really got me down. I almost want to throw that thing away.
I think I finally got the end-grain clogged up good with the last coat. I should stop now and let this dry hard so I can sand out the nits and continue. The can says re-coat within two hours or after 72. That means it is the good stuff, which I already knew. Re-coat any time means lacquer - echh !!!
Spraying aerosol like this is pretty nasty business. If I couldn't do it outdoors, I wouldn't be doing it at all.
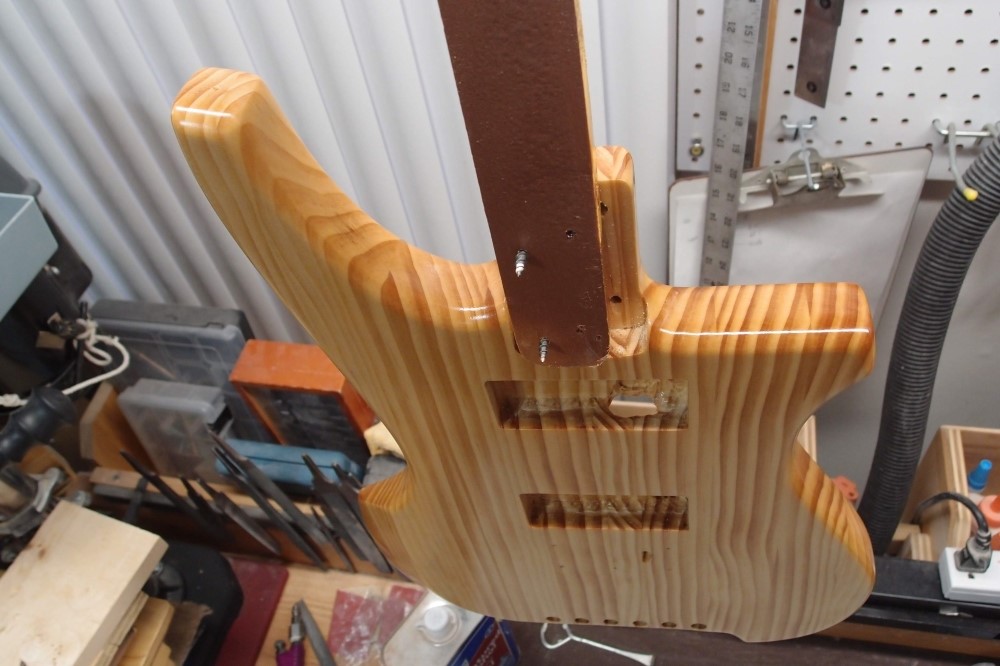
The true polyurethane is really bringing out the grain of this inexpensive Home Depot wood. The Radiata neck I did came out the same, and it is staying arrow-straight. I don't see why I should cover up the edges with a burst, they look great. Luthiers pay a lot of money for tropical hardwoods to get this effect. The wood also has a translucent shimmer, like an overall light flame.
Compare this to the poor water-based victim at the top of the page. Also, note the lovely ambering you get from real polyurethane. There is no comparison. This is also already a much better finish than I ever managed to get with the UV-poly, much easier and worlds cheaper. This Krylon is the stuff !!!
You can see the black pine pitch inside the upper horn. There's no way to know that is there until you cut through it. At that point, it's too late to do anything about it, unless you want to start over. At least it is in a spot where you have to look for it. This is my third Radiata body, and the first time this has happened.
That's a risk of using pine. On the plus side, this wood is almost totally free of knots, voids, cracks, and flaws of any kind. You never know what you'll cut into with hardwoods. This pine is also a good deal harder than many 'hardwoods', particularly, alder, poplar, and basswood, which is more like styrofoam.
The upper horn looks huge - the fish-eye effect of the camera lens at the corners of the frame. Better than the fish-eye effect of water-based 'polyurethane' !!!