Work Bench (2/2)
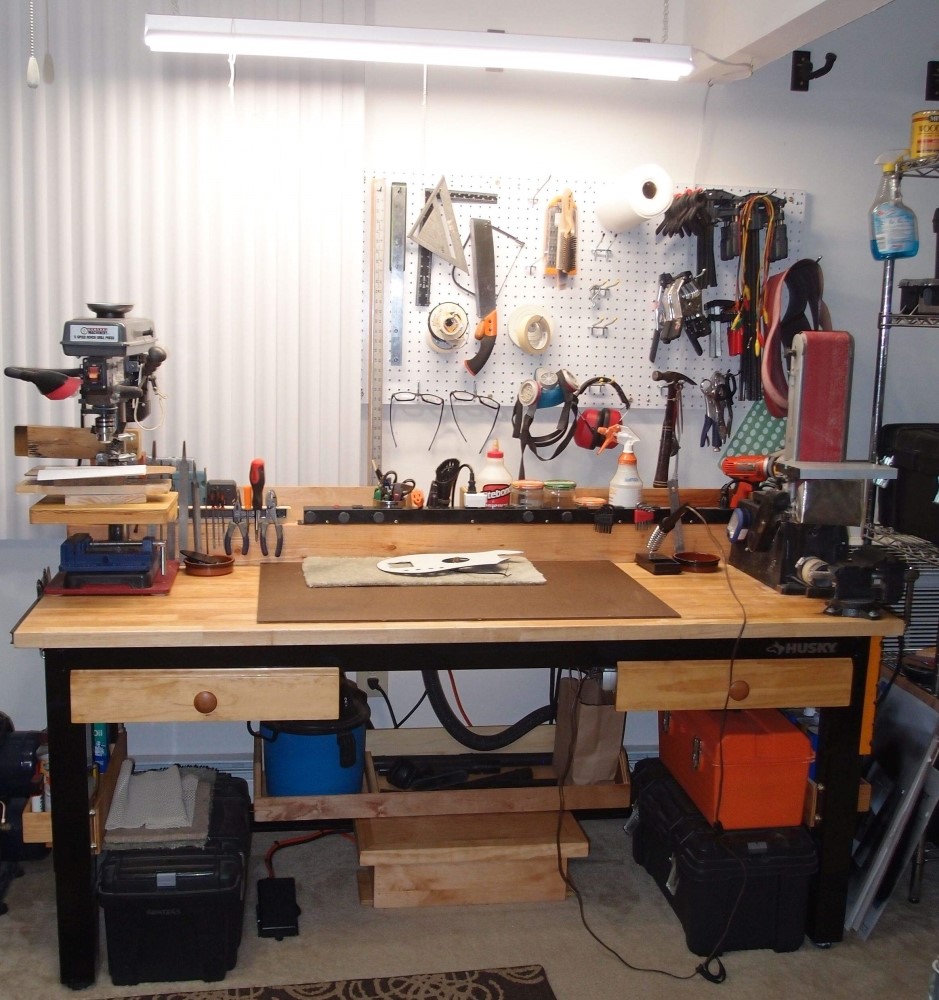
Underneath, I added stiffeners and a light-duty shelf to the back cross-brace. So the vacuum now has a home, as well as all of its accessories. There is room for two more of the large black toolboxes if I stack them, and still a place to sit in the center. I figure the bench now has about 15 square feet of storage, if you include the floor space for the toolboxes. Plus the pegboard. The important thing, though, is that it is all at my fingertips.
Have you ever had a tool or a part in your hand one minute, put it down, and spent the next half an hour searching for it? I hate that, especially when it is the chuck key for the drill. The power strip is made of steel, and is now festooned with cheap magnets to hold all the little things that go missing like that. I even put some magnets on the drill and sander, for a quick place to stash a drill bit.
Everything got a coat of yellowing linseed oil. I think this thing is completely built-out now, but in a few months those bins will be overflowing, and I will probably think of something new. Like maybe smaller bins to attach to the big ones. Ha !!! From now on, I am calling this "The Slab".
Above the bench you can see the bright LED worklight (also free) with a convenient pull-chain. You have to have good light. A loop of string around the light is for hanging small things. On the wall is a 2'x4' pegboard with various tools, lots of clamps, protective gear, sanding belts, and even paper towels. The pegboard is framed on the back with 1x2 firring strips, which reinforces it and gives clearance for the hooks.
At the back edge of the workbench, which is flush with the frame, I added a backsplash of a 2x6 using long drywall screws, so that it does not reduce the work area. The original intent of the backsplash was to mount the long black outlet strip ( Harbor Freight $20. ) This strip has a breaker, but no surge protection.
To the left of the outlet strip is a magnetic tool holder; there are the same at each end of the bench top, free with HF coupon. The outlet strip is steel, so I added magnets between the outlets to hold small tools and parts. The magnets are backed with masking tape to prevent the hard ceramic from marring the strip. You can stick magnets anywhere, the inside of the top of a steel toolbox, for example. The backsplash prevents small things from going off the back edge of the bench, and also gives something you can push against.
The back of the backsplash now presented a new space, and I built a pair of storage bins to mount there. The bins are sized to fit a 1 quart steel can, the kind that paint thinner comes it. The bins are not too deep, so I can lean over and fish for things in the bottom of them, and also read the labels on the cans. The back edge of the bins is higher than the front, to make it easy to slap things in. Between the bins is a gap for wires and hoses. The vacuum hose comes up through here, with a bracket to keep it from falling under. The orange outlet connects to the footswitch below, allowing remote control of any tool I plug in to it, typically the drill press. The foot switch outlet is also secured from falling. To the right of the vacuum nozzle you can see the white control switch for the vacuum.
The bin on the left is full of tools, the bin on the right has wide-mouthed jars of various solvents: acetone, mineral spirits, alcohol, and a spray bottle of water. These are not 'clean' jars, if I need to soak something, I just throw it in. The tall jars will fit an entire airbrush or a broken-down sprayer. When it gets too grungy, I filter it out and top it off from a clean supply. This is much handier and more economical than trying to work from the steel containers, which I can still go to if I need 'clean' stuff. At the right end, the cordless drill finally has a home, with its charging cable secured to a hook so it doesn't fall down.
Acetone is very strong, and will eat most anything organic: plastics, lacquer, polyurethane ( takes a while ) pretty much anything. It is good for stripping, and cleaning that sprayer you should have cleaned last week. Acetone will also dissolve even old Crazy Glue, but may do more damage to the underlying material. Mineral spirits is much milder. It can strip lacquer and recent polyurethane, but is really more used as a thinner and parts cleaner. Alcohol is even milder than mineral spirits, on most materials. It will still attack lacquer ( what doesn't? ) and is good for wiping things down prior to spraying, as it leaves no residue. It also cleans up Sharpie ink. Titebond I (red) is the strongest and cheapest of the three Titebonds, and the best suited for loothery, where water resistance is unimportant.
On the benchtop, the drill press and belt sander have permanent spots, which still leaves a large 48" work area in the center, covered with a sacrificial piece of masonite, actually an old dry-erase board. You can also see a piece of carpet that makes an excellent soft work mat. The front and sides of the top are clamp-able. There is a vise through-bolted to the right front corner. I installed T-nuts for vise mounting under both front corners before assembling the bench. A workbench without a vise is just a table.
The drill press is the smallest one from Harbor Freight, which you can get at times for under fifty bucks. I have a better one elsewhere, I wanted small for this location, and it does about 90% of what the bigger one will do. The drill's table is dinky, so I built a wooden top for it that goes on and off with a mallet. I also built an extended base to make it more stable, and a sort-of fence that clamps to the post. Thick felt feet let me slide it around on the workbench without scarring it. The chuck key is tethered to the drill to save untold hours of searching for the D@%$#& thing. It also has a magnet on the side of the motor casing to stop the danglies. A magnetic cup on the top of the drill is a convenient place to store bits when working with more than one.
The runout (wobble) of this drill is perfectly acceptable for woodwork, once I knocked the chuck out and installed it straight. ( I got it crooked the first time. ) This is one of the only power tools from Harbor Freight that I could actually speak well of. Most of their tools burn out surprisingly fast, but this one has held up, even under the extended abuse of being used as a drum sander. It has plenty of power to drive even my biggest Forstner bit into hard wood.
The belt sander is a factory-reconditioned Skil, equivalent to a Ryobi. It works well enough. I improved the dust collection and blanked-off the sanding wheel, which is useless and dangerous. After several years use, the drive belt finally stripped and I have to replace it. Felt feet on this machine as well, so I can slide it out of its parking spot when I want to use it. Almost out of sight atop the belt sander is a tiny 3" bench grinder/polisher from Harbor Freight. This grinder comes with a Dremel attachment that works very well, better than an actual Dremel. It is perfect for all sorts of loothery tasks. This is the other Harbor Freight power tool I could recommend. I have a 6" benchtop grinder as well, but not here.
I think I demonstrated at the start of this thread that with these two bench tools, some kind of curve-cutting saw, and a few other hand tools, you can build a guitar. The other three biggies on the benchtop are the scroll saw, band saw, and oscillating spindle/belt sander.
Immediately under the top of the workbench are two wide flat drawers. In case you haven't noticed, drawers are expensive. I salvaged these from an wooden desk that my tirelessly wasteful school district was throwing away. I had to build brackets for the sliders, which are the cheapest ones from Home Depot. The fronts are pine floor moulding, with Shaker knobs, for a nice furniture-y look. A workbench without storage is just a table.
The right-hand drawer mounts another power strip / surge suppressor, which powers the main strip, the light, footswitch, and chargers, and protects everything. The front two outlets are still free and reasonably easy to access. That makes 12 outlets on top and six more underneath, so no more having to unplug one thing to plug in another. With so many outlets free, might as well add USB charging. You can never have too many of those. A workbench without power is just a table.
Nestled in the bench legs are two smaller storage bins, for things I use less often - solvents, polishes, glues etc. In the middle is a large light-duty shelf for the vacuum ( also free. ) The vacuum can be turned on and off from above, and the extended hose reaches all over the bench top, and plugs into the sander and other tools for dust collection. The 'extended hose' is actually a hose from a vacuum someone threw away that happens to fit onto the end of the stock hose. There are absolutely no standards for these things, so whenever I see a dead vacuum by the curb, I grab it on the chance that it might have some useful parts. Eventually I'd like to build a 'muffler' for the vacuum's outlet to quiet it down. The vacuum can also be gotten out of there without too much trouble if I want to use it somewhere else. For an indoor workshop like this, efficient dust collection and cleanup are essential.
Under the vacuum shelf is the work box I have described ad nauseum previously, flanked by two big black tool boxes and the foot switch. The vacuum shelf is not really necessary, but I wanted to get as much as I could up off the floor, so I or my new little robo-vac ( free! ) can get under there to clean. The robo-vac works very well, much to my surprise. To the right of the workbench you can see a large chrome storage rack, full of big black tool boxes and parts bins (free.) To the left is my favorite compressor ( you guessed it - free! )
All of my add-on woodwork got a coat of linseed oil to yellow it up to match the top. All in all, it doesn't look too bad when it's cleaned up. All the most-used tools are at my fingertips, with plenty of space to work. Also serves as a writing/computer desk, which is why I wanted the whole thing to be surge-protected. One of those outlets might as well have a USB charger in it too.
I'm not writing this out of vanity, although I am pretty pleased with the whole setup. I think there are some good ideas here that others might find useful. After all, you can't build it if you don't have a place to build it.
Update:
The vacuum noise turns out to be mostly from the motor, much less from the airflow. I made a muffler from an extra crevice tool, an old sock, and a wire tire, and it only helped a little. Turns out swaddling the whole thing in an old towel works much better, and since it is out of the way and I don't need direct access to it except to clean it out periodically, that is a good solution. At least it kills most of the high frequency whine. Some vacuums get distinctly quieter when you switch them from suck to blow, but not this one.
Bench Vise
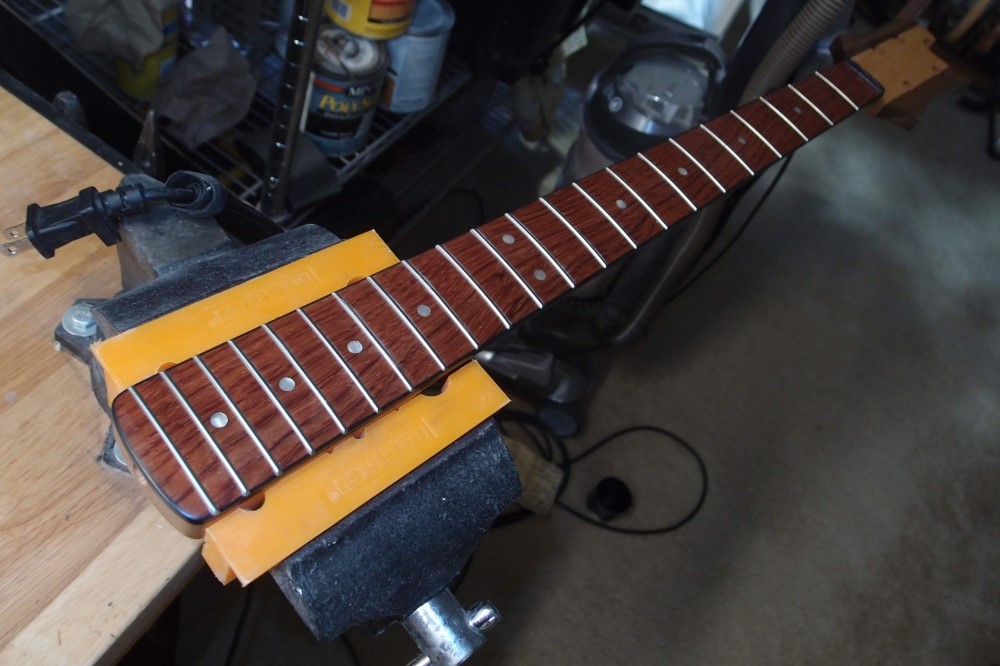
Touching up the Ric necks, which are basically done. I re-sprayed both sides of the headstock, which leaves an obvious problem. This shows you how big a vise you need. This is a 3-1/2" vise, open to about 3-3/4". It gets the job done. I can't think of a loothery task that would need a bigger vise, and bigger vises become pretty massive and expensive, so I'd say this is a good size.
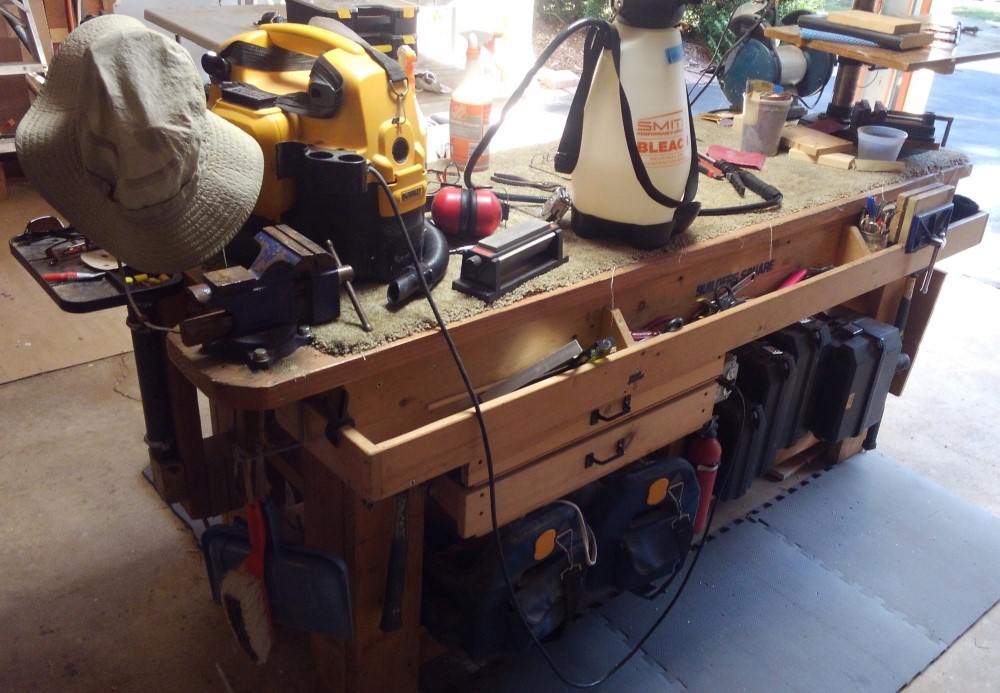
This is my other workbench, which I call "The Beast". It is built from the parts of a much smaller workbench that someone gave me, together with some roof rafters I dragged out of the woods.
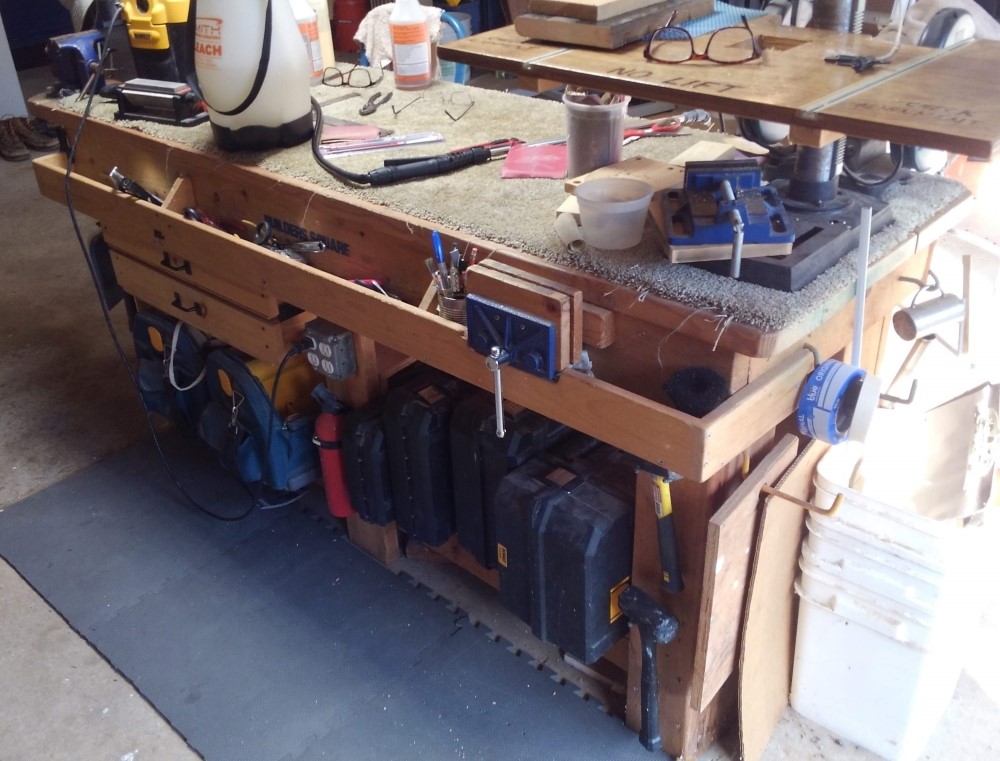
Of course, it has a handy tool bin and a massive amount of storage underneath.
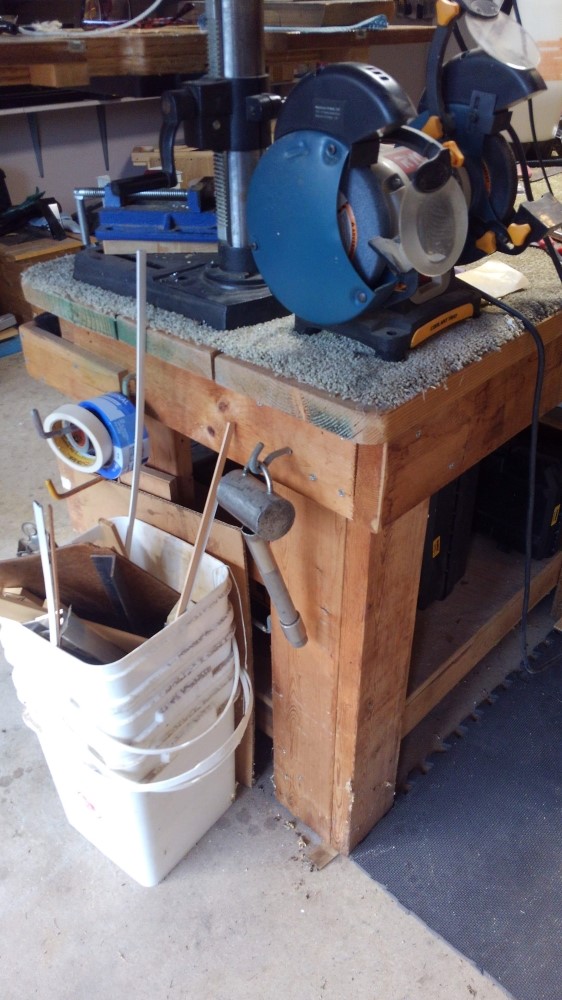
Detail of a corner leg - easy, yet very strong and stiff construction. The Beast is actually more square and true than the garage floor, requiring some shims to keep it from rocking.
Questions or Inquiries?
Just want to say Hello? Sign the .