Finishing Stand
I guess I would call this a finishing stand. It is vaguely inspired by StewMac's typically over-designed finishing stand. I think mine is more practical and does not require a bench vise, which means you can use it anywhere. It is also $90 cheaper. Credit where credit is due: many of my ideas come from flipping through the StewMac catalog, although I think I often improve on their designs and definitely improve on their prices.
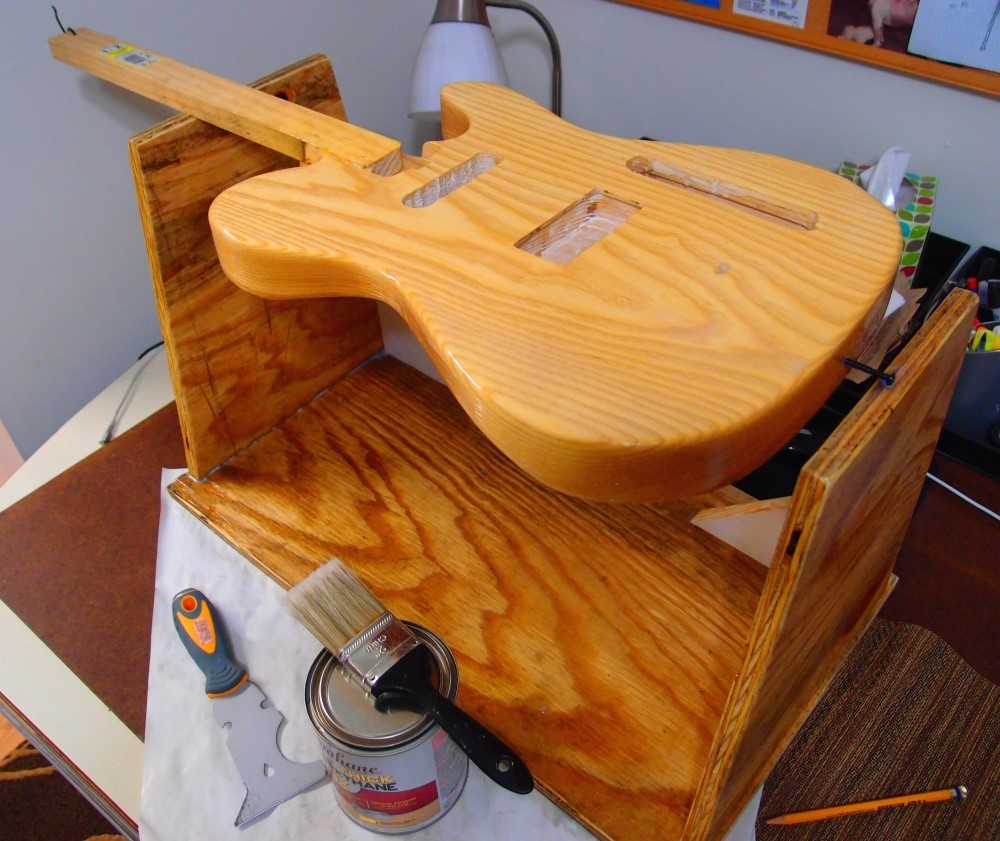
What you've got here is an open frame made from scrap 3/4" plywood that I think I found somewhere, fast and free. I just cut the pieces freehand and liberally glued them together - no fasteners - I let the tackiness of the glue hold it all together until it set. You can just see the two triangles of scrap wood that brace the uprights. I came back two days later, and it was solid as a rock. I quickly broke over all the edges with a sander and then sealed them with poly as I worked on the real project because plywood splinters are not my favorite thing in the world. The distance between the uprights is 22" - enough to fit a jazz bass body. The height is whatever took the least amount of cutting with the circular saw - the whole thing was together in literally minutes.
You can see a long thin screw in the strap button hole, and a handle attached in the neck pocket. The handle is a scrap of 1x2, drilled to match the neck mounting holes in the body and attached with 2 drywall screws, with a coat-hanger hook at the other end. Thus, the attachment points are places that will be hidden in the finished product. The handle allows you to 'clock' the workpiece at 90-degree angles for finishing. Here. I'm using some triple-thick brush-on polyurethane that Home Depot gave me to evaluate. The stand would work equally well for spray applications and allows access to all sides and edges at once.
The goal with this piece is to build up a thick layer of plastic as quickly as possible and brushing beats spraying, and all you need is a brush - not a whole spraying setup. I let each coat get just dry enough to touch, and then add another, so they all bond together into a single layer. You don't get a smooth finish like this, that comes later after wet-sanding and polishing. Prior to this the ash body was grain-filled and sanded smooth, and given three coats of 'natural' stain, which gives that nice aged yellow color, as opposed to the white you can see inside the cavities.
So far, everything is working perfectly, and much easier than the old Fender trick of balancing the body on three long nails in the pickguard holes, or clamping the handle in a vise.
Questions or Inquiries?
Just want to say Hello? Sign the .